StudentAid
Unit 2: System Recovery and Advanced Maintenance — Long Questions
10th Class Computer Science · Unit 2: System Recovery and Advanced Maintenance
★ Key Points: Post-Troubleshooting Continuous Maintenance
Troubleshooting steps, including restarting the system, checking physical connections, and addressing simple issues related to software or hardware and to fix common computer problems. The next step is to learn what actions to take once the issue is resolved. This process is called post-troubleshooting maintenance. It includes additional steps that help the computer continue to work properly and avoid the same problems in the future.
Importance of Continuous Maintenance
Solving a computer problem is only the first step. The system still needs regular care to continue working properly. Without maintenance, the same issue can happen again, or new problems may appear. Regular maintenance keeps the system stable and prevents future problems. It ensures better performance, longer life, and fewer disruptions in computer usage.
Example If the computer becomes slow due to full storage, deleting a few files may improve its speed for a short time. However, if unnecessary files are not removed regularly or the system is not updated, the same issue may occur again.
★ Key Point: Impact of Poor Maintenance
If a computer is not maintained regularly, it may face several problems that affect its performance and reliability. The following issues commonly occur due to a lack of proper maintenance:
1. Slow Performance: Temporary files, unused programs, and background processes can build up over time. If these are not managed, the computer may become slow and unresponsive.
2. System Failures: If important system updates are not installed, the computer may stop working properly. It can freeze, crash, or fail to start.
3. Security Risks: When the system or apps are not updated, harmful software like viruses can enter the computer more easily.
4. Data Loss: Without backups, important files can be lost during crashes or hardware failure.
5. Hardware Damage: Dust and overheating can damage the hardware components if the system is not cleaned or properly ventilated.
★ Key Point: Health Monitoring
System Health Monitoring
For the smooth running of a system, it is important to check its performance regularly. This process is known as system health monitoring. Modern operating systems, such as Microsoft Windows, include built-in tools that help monitor system activity. These tools allow you to:
- Check how much memory and processing power are being used.
- Monitor background applications and services.
- View system warnings and error messages.
- Identify programs that may slow down the computer.
Regular monitoring helps detect small issues before they become serious. By using these tools, users can take timely actions to improve performance and avoid future problems.
★ Key Points: Built in Diagnostic Tools | Task Manager | Resource Monitor | Event Viewer
In addition to basic troubleshooting steps, modern operating systems provide built-in tools to help users monitor system performance in more detail. These tools give useful information about the computer's current state and help identify problems related to memory, storage, processing power, and system errors. These are three important diagnostic tools available in Microsoft Windows:
1. Task Manager
2. Resource Monitor
3. Event Viewer
Each of these tools plays a different role in resolving system health and performance-related issues
1. Task Manager
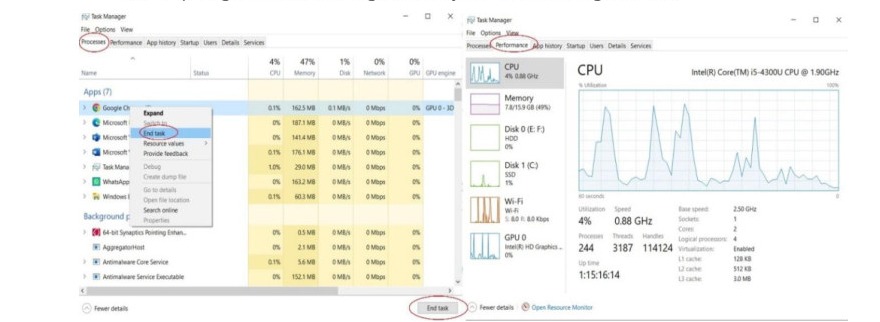
Task Manager is a built-in tool in Microsoft Windows that helps users to monitor the performance of their computers. It shows real-time information about how the system's processor (CPU), memory (RAM), and storage (disk) are being used. The Processes tab of the task manager shows all active programs and how much system resources they are using, while the Performance tab displays detailed graphs for CPU, memory, disk, and network usage.
Example If your computer is running slowly, you can open Task Manager to see which application is using too much CPU or RAM (e.g., a browser with many tabs). Ending that task
a. How to Open Task Manager?
There are two simple ways to open Task Manager:
i. Press the Ctrl + Shift + Esc shortcut key from the keyboard
ii. Right-click on the taskbar and select Task Manager from the menu
b. What You Can Do with Task Manager?
Task Manager is helpful when your computer is slow, or an application stops responding. It allows you to:
i. See how much processing power and memory are being used by each program.
ii. Select a program from the processes tab of task manager and click End Task to close it if it is not working properly.
iii. View programs running silently in the background.
iv. The performance tab of the task manager shows real-time graphs and data showing how your computer is performing.
2. Resource Monitor
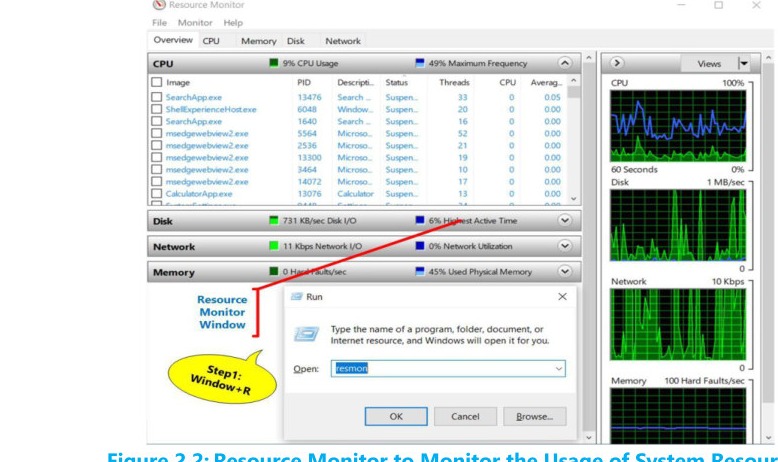
Resource Monitor is an advanced system tool in Microsoft Windows that gives a deeper view of how your computer's resources (memory, CPU, and disk) are being used. While Task Manager gives a quick overview, Resource Monitor provides more detailed information about which programs and background services are using system resources. It is especially helpful when the system is running slowly, overheating, or using a lot of memory without any clear reason.
Example If your computer is slow but Task Manager doesn't show a clear reason, open Resource Monitor, check the Disk tab, find a background program heavily using the disk, then stop or investigate it.
a. How to Open Resource Monitor?
There are two common ways to open Resource Monitor:
i. Open Task Manager, go to the Performance tab, and click on Open Resource Monitor at the bottom.
ii. Or press the shortcut key Windows + R, type the command resmon in the dialog box that appears, and press Enter key.
b. Key Features of Resource Monitor
Some key features of the resource monitor are listed below:
i. CPU Tab: Shows which processes and services are using the processor.
ii. Memory Tab: Displays how much memory is used, free, or reserved.
iii. Disk Tab: Monitors which programs are reading from or writing to the hard drive.
iv. Network Tab: Shows which applications are sending or receiving data over the internet or network.
3. Event Viewer
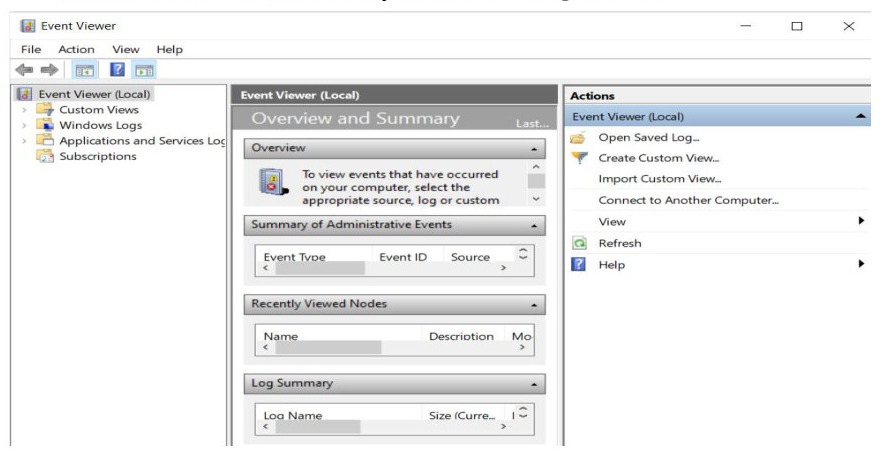
Event Viewer is also a built-in Windows tool that records detailed logs of system activities. It helps users check for errors, warnings, and important events related to software, hardware, and security.
Example If Windows crashes or an application keeps failing to start, Event Viewer can show error messages (like "Application X failed to start due to missing DLL"), helping you identify the cause and troubleshoot it.
★ Key Points: System Recovery Options | Safe Mode
In some cases, basic troubleshooting is not enough to fix a problem. The computer may crash, become unresponsive, or fail to start. To handle such situations, operating systems like Microsoft Windows provide special tools known as system recovery options. These recovery options help restore the computer to a working state without losing important data in most cases.
1. Safe Mode
Safe Mode starts Windows with only the most fundamental drivers and services. It disables unnecessary background programs and startup software, making it easier to fix problems caused by faulty apps or settings.
2. When and How to Use?
Safe Mode is useful when:
- The system keeps crashing or restarting
- A program or driver is causing the computer to freeze
- You need to scan for malware or uninstall a recent app
3. How to open Safe Mode?
a. On most systems: Go to Settings > Update & Security > Recovery > Advanced Startup > Restart Now. Then choose Troubleshoot > Advanced Options > Startup Settings > Restart > Press F4 key.
b. On some older systems: Restart and press F8 key repeatedly before the Windows logo appears. Select safe mode, press Enter key.
4. Safe Mode with Networking
This version of Safe Mode includes network drivers, so you can access the internet. It is helpful when:
- You need to download updates or drivers
- You want to use online help tools
- You want to run a cloud -based antivirus scan
To enter it, follow the same steps as above and press F5 key instead of F4 key.
SMART TIPS
While using safe Mode, follow these precautions:
- Do not change setting unless you understand their purpose.
- Avoid deleting system files; they may be important for Windows to work properly.
- Use only built in or trusted tools to fix issues.
- Restart your computer normally after finishing the task.
- Ask for help from your teacher or IT expert if unsure.
- Safe Mode is powerful, but it should be used carefully.
★ Key Points: | System Restore | Bootable Recovery Media
1. System Restore
System Restore allows you to take your computer back to an earlier state without deleting personal files. It works by using restore points, which are saved versions of your system created before major changes.
2. What are the Restore Points?
A restore point is like a saved snapshot of your system's settings and files. It helps you return your computer to an earlier, working condition if something goes wrong, such as after installing a faulty program or driver. Restore points are made automatically before system updates or driver installations, or manually by the user when it is needed.
3. Steps to Create a Restore Point
Follow these steps to create a restore point manually:
- Click the Start button and open the Control Panel.
- Go to System and Security, then click System.
- On the left, click System Protection.
- In the new window, under the System Protection tab, click the Create button.
- Type a name for your restore point (e.g., "Before installing printer driver") and click Create.
- Wait a few seconds for confirmation. Your restore point is now saved.
4. Steps to Use a Restore Point
If your computer is not working properly, follow these steps to go back to a previous state:
- Open the Control Panel.
- Go to Recovery and click Open System Restore.
- A window will appear showing available restore points.
- Select the most recent restore point when your system was working fine.
- Click Next, then Finish.
- Your system will restart and restore the selected settings.
★ Key Points: Bootable Recovery Media
1. Bootable Recovery Media
A computer may stop working completely and fail to start. In such cases, normal recovery options like Safe Mode and Restore Points may not work. So, in this case, we use bootable recovery media to recover the system.
2. Understanding Bootable Media and Its Uses
Bootable recovery media is a USB (Universal Serial Bus) flash drive or DVD (Digital Versatile Disk) that contains important system files. It helps the computer start from an external device instead of the built-in storage. After starting the system, you can use built-in recovery tools such as:
• Startup Repair to fix problems that prevent Windows from loading.
• System Restore to go back to a working state using a restore point.
• Command Prompt for advanced troubleshooting.
• System Reset or Reinstallation to reinstall the operating system if needed.
3. When We Use Bootable Media
We use this media in such cases where the system:
• Safe Mode is not accessible.
• You need to repair or reinstall the operating system.
4. How to Create a bootable USB?
• Download the system image or installer from the official website of your operating system provider (e.g., Windows ISO (International Organization for Standardization), Linux ISO, or macOS installer).
• Download Rufus (a free USB tool) from its official site (https://rufus.ie/en/), for Windows only. For macOS, you can use its built-in tools like Terminal or Disk Utility.
• Plug in a USB drive (16 GB or more).
• Open Rufus, select the USB and the ISO file.
For Windows or Linux systems, choose GUID Partition Table (GPT) for modern PCs and Master Boot Record (MBR) for older systems. Then click Start to create the bootable USB.
5. How to Check the Partition Style (MBR or GPT)?
To check the Partition Style, you need to:
• Press Win + X and select Disk Management.
• Find the drive where Windows is installed (usually Disk 0).
• Right-click on the disk label (e.g., Disk 0), then choose Properties.
• Go to the Volumes tab.
6. Look at Partition Style
It will show either:
a. GUID Partition Table (GPT)
b. Master Boot Record (MBR)
★ Key Points: BIOS | UEFI | POST Test
1. Firmware
Firmware is special software stored in hardware memory (usually non-volatile memory like ROM or flash memory). It controls basic computer functions before OS starts. The BIOS/UEFI is an example of firmware. When you press the power button on your computer, several hidden steps take place before the operating system (like Windows) appears on the screen. These early steps are controlled by special built-in software called firmware.
2. Common Types of Firmware
All computers have special software built into the motherboard called firmware. It is not stored on the hard drive and does not get deleted when the computer is turned off. Firmware gives the computer basic instructions on how to start.
Two common types of firmware are:
a. BIOS older firmware software shows a basic, text-only menu and works with the keyboard only.
b. UEFI newer type of firmware software, supports a graphical menu that uses both mouse and keyboard, and larger hard drives.
3. Role of BIOS/UEFI in Starting the Computer
- Checks if the hardware is working correctly (like RAM, keyboard, and hard drive).
- Finds the boot device (USB, hard disk, etc.) and starts the operating system.
- Allows users to change system settings like date, time, and boot order.
★ Key Points: Post Test | Accessing BIOS | Opening BIOS | Boot Order
1. The POST Test
POST stands for Power-On Self-Test. It is the first thing the firmware does after the computer is turned ON. POST checks the most important hardware to make sure everything is working properly. If all parts are fine, the computer continues to load the operating system. If something is wrong, it may beep or show an error message on the screen.
Example: If the RAM is missing, the computer will beep continuously.
2. Accessing BIOS and resetting to defaults
Sometimes you need to enter BIOS/UEFI to change settings or fix problems.
3. How to Open BIOS/UEFI Settings?
To open this setting, you need to shut down your computer
a. Turn it ON and immediately press a key like Del, F2, F10, or Esc (the correct key depends on the brand, like HP, DELL, and MSI).
b. The BIOS or UEFI screen will appear
4. Resetting to Default Settings
If the wrong settings are saved, you can restore the system to its original state by selecting "Load Setup Defaults" or "Reset to Default" inside BIOS/UEFI settings.
5. Boot order and boot repair
Boot order means the sequence in which the computer looks for a device to load the operating system. For example, it may try the USB drive first, then the hard drive.
6. How to Change Boot Order?
• Enter BIOS/UEFI settings.
• Go to the Boot tab or menu.
• Move your desired device (e.g., USB) to the top of the list.
• Save changes and exit.
Sometimes the computer cannot start due to missing files or errors. This can be fixed by using Startup Repair from Windows recovery USB or DVD.
★ Key Points: Built-in Tools | Third-Party Tools | Tenorshare
Data Recovery Techniques
Sometimes, we delete files by mistake or lose them due to system problems. In many cases, it is possible to recover lost files using built-in tools or with the help of special third-party software. There are two main ways to recover deleted files:
1. Using built-in tools (i.e Recycle Bin)
2. Using third-party software (i.e Tenorshare)
1. Built-in Tools
These tools are already part of the operating system, which is why we call them built-in tools. We will discuss some built-in tools that are available to recover deleted files.
a. Recycle Bin
When a file is deleted in Windows, it usually goes to the Recycle Bin. It stays there until the bin is empty. You can open the Recycle Bin, right-click the file, and select Restore to bring it back to its original location.
b. File History
File History is a backup feature in Windows. If it is turned on, the system keeps copies of your files at regular intervals. You can recover files from earlier versions, even if they have been deleted or changed. To turn it on, go to Settings > Update & Security > Backup, connect an external USB or Hard drive, and select "Add a drive" Once enabled, Windows will regularly back up your files like Documents, Pictures, and Desktop on that drive.
c. Previous Versions
This feature allows you to recover an earlier version of a file or folder. Right click the file or folder, choose Properties, then go to the Previous Versions tab. If available, you can select and restore an older copy.
2. Third-party tools
Sometimes, deleted files are not found in the Recycle Bin or Previous Versions. In such cases, you can try using third-party recovery software. Tenorshare is a free and easy-to-use file recovery program demonstrated in the following figure. It can scan your hard drive, USB, or memory card to find files that were recently deleted. You can then choose which files to recover
a. How to use Tenorshare?
Steps to Use Tenorshare:
• Open Tenorshare, select the location from which you want to recover a file, such as a specific drive or folder
• Choose the type of file to recover (e.g., pictures, documents).
• Click "Scan" to start searching for lost files.
• Select the files you want to recover and click "Recover" to restore them.
Recovery success depends on how recently the file was deleted and whether new data has overwritten it.
b. How deleted files can be recovered using third-party software?
i. Deletion doesn't erase data immediately: When you delete a file, Windows marks the space it occupies as "available" but doesn't remove the actual data.
ii. Scanning for recoverable data: Third-party software (like Tenorshare, Recuva, or EaseUS) scans the disk for data that is still physically present but marked as deleted.
iii. Restoring the file: Once the software detects the file, it can copy it to a safe location (preferably on a different drive) so the data is recovered without overwriting other files.
c. Why recovery may not always be successful?
i. Overwriting: If new data has already been saved to the space where the deleted file was stored, part or all of the file may be overwritten and unrecoverable.
ii. File system damage: Corruption in the disk's file system can make the deleted data unreadable.
iii. Time factor: The longer you wait after deleting a file, the higher the chance that new files will overwrite the deleted data, reducing recovery success.
★ Key Point: Limitations of Recovery & Best Practices
Limitations/Drawbacks of Recovery and Best Practices
While data recovery tools can be helpful, they have the following limitations:
• If a file is deleted a long time ago, it may no longer be recoverable.
• Recovery is not always possible if the hard drive is damaged or formatted.
• Files may be permanently lost if the Recycle Bin is emptied, and no backups were made.
SMART TIPS
1. Never install recovery software on the same drive where your lost file was stored. This may reduce the change of successful recovery.
2. Always check the recycle bin first before trying advanced recovery tools. It is the easiest and safest way to restore deleted files.
★ Key Points: Preventive Maintenance | Disk Cleanup | Patch Management | Windows Defender | Maintenance Calendar
1. Best Practices for Preventive Maintenance
Just like we take care of our health or maintain our vehicles, computers also need regular attention to keep working properly. Preventive maintenance means doing simple tasks that help avoid bigger problems in the future. These tasks can improve your computer's speed, keep it secure, and help it last longer.
a. Disk Cleanup
After some time, the computer collects unnecessary files such as temporary internet files, system cache, Windows update files, and items in the Recycle Bin. These files take up space and may slow down system performance. Disk Cleanup is a built-in Windows tool that helps remove such files safely.
Steps to Perform Disk Cleanup:
• Type Disk Cleanup in the Windows search bar and open the tool from the list. This opens a small window asking you to choose a drive to clean, as shown in Figure.
• Select the drive you want to clean (usually C:) and click OK.
• Check the boxes from the dialog box that appears after OK, as shown in Figure, for the types of files you want to delete.
• Click OK to remove the selected files.
2. Patch Management/ System Updating
Software updates, also known as patches, are released regularly by developers to fix bugs, add features, and improve security. Keeping your system updated helps to protect it from viruses and security threats. There are two types of updates:
1. Operating system updates (for Windows, macOS, etc.)
2. Application updates (for programs like browsers, media players, etc.)
To check for updates in Windows:
• Open Settings > Update & Security.
• Click Check for updates.
• Install the updates if available.
3. Staying Protected with Windows Defender
Windows Defender is the built-in security tool in Windows that protects your computer from viruses, malware, and other threats. It offers two types of scans.
a. Quick Scan to check common problem areas.
b. Full Scan to check the entire system thoroughly.
Windows defender also provides real-time protection, which means it keeps watching your system in the background and alerts you if anything suspicious happens.
4. Keeping a maintenance calendar
It's a good idea to set a regular schedule for basic maintenance tasks. A maintenance calendar helps you remember when to clean your system, scan for viruses, or check for updates. You can write it down or set reminders on your phone or computer
★ Key Points: System Documentation | Troubleshooting | Compliance and Auditing
System documentation and logs are records that keep track of how a computer system is set up, what changes have been made, what maintenance has been done, and how it is performing. They help in several ways:
1. Tracking Changes: These records show what hardware has been added or changed, what software has been installed, and what settings have been adjusted. This helps people understand what has been done to the system over time.
2. Monitoring Performance: Logs record things like system errors, warning messages, and what applications are doing. This helps find out if there are any repeating problems or possible issues that might come up.
3. Troubleshooting: When something goes wrong, logs give detailed information that can help find the main cause of the problem quickly.
4. Planning Maintenance: By looking at the documentation, people can plan when to update the system, back up data, and do regular checks to prevent problems before they happen.
5. Compliance and Auditing: In work environments, logs and records help make sure the system follows security rules and legal standards.
Keeping accurate records of system documentation and logs ensures that the computer operates efficiently, handles problem quickly and system downtime is minimized.
More figures from this unit